The Domain Name System (DNS) is the fundamental component of Internet communications. It translates human-readable names, such as www.example.net, to IPv4 or IPv6 addresses that can be accessible through a network.
The standard DNS protocol is very old and cannot satisfy the requirements of modern networking, including security, flexibility and reliability. To address these problems, a number of improvements and new protocols have been suggested, but unfortunately, they are not well supported, even by the latest operating systems and apps.
YogaDNS helps to resolve all these problems and move DNS to the next level. It can resolve hostnames over DNSCrypt, DNS over HTTPS (DoH) and plain (standard) DNS protocols as well as perform DNSSEC validation (local and remote). DNSCrypt can be anonymized through relays. Additionally, YogaDNS features built-in support for NextDNS.
The key feature of YogaDNS is the system-level integration. In other words, there is no need to change any existing DNS settings in multiple places. YogaDNS captures DNS requests at the system level and processes them according to your configuration and rules.
Even if you do not plan to use modern DNS protocols yet, you can get a lot of benefits and powerful features. YogaDNS allows you to define and use multiple DNS servers and pools simultaneously and set the rules based on hostname mask. You can process or block the resolves, choose the network interface, and so on. Optionally, you can set the rules to be triggered only if there is a specific network or VPN connection available.
Finally, with YogaDNS you can easily import publicly available DNS servers from the web, test them and find the best ones.
Installation is easy and straightforward. YogaDNS is available as a download package at www.yogadns.com. It can be installed on Microsoft Windows 7, 8, 8.1 or 10 or Windows Server 2012, 2016 or 2019. Both 32- and 64-bit editions are supported.
Simply run the YogaDNSSetup.exe setup program and follow the steps of the installation wizard. No reboot is required.
Similarly, you can uninstall YogaDNS at any time. Simply go to
When you start YogaDNS for the first time with an empty configuration, it will display the First Start Wizard window where you can choose from a number of predefined scenarios. You can run this wizard any time with
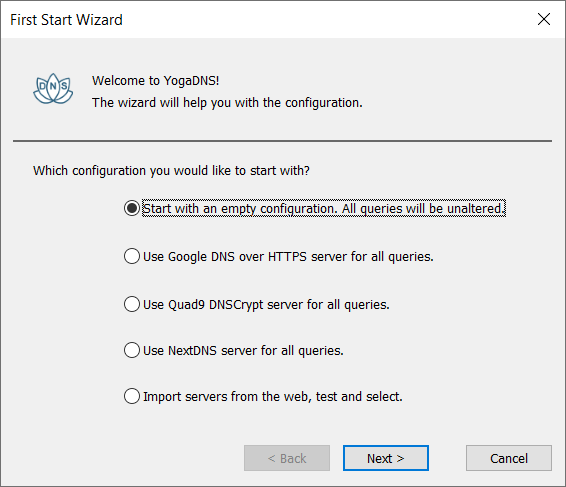 First Start Wizard
Normally, when you start YogaDNS, it runs in the background and adds its icon to the system tray. (If you do not see the YogaDNS icon, click on the arrow-like icon on the left side of the system tray.)
 YogaDNS in the Windows 10 system tray
To open the Main Window, left-click the icon. By right-clicking, you can quickly access DNS Servers or Rules or
If there are no DNS servers or rules in YogaDNS all DNS queries are bypassed. Still, you should see them in the log window as below:
[10.31 15:53:16] google.com - bypass : rule=Default
[10.31 15:56:14] www.google.com - bypass : rule=Default
[10.31 15:56:14] ssl.gstatic.com - bypass : rule=Default
At this point, you can manage DNS resolves with Rules. It is possible to block certain domains or force resolves through the selected network interfaces (default DNS servers will be used).
To add a specific
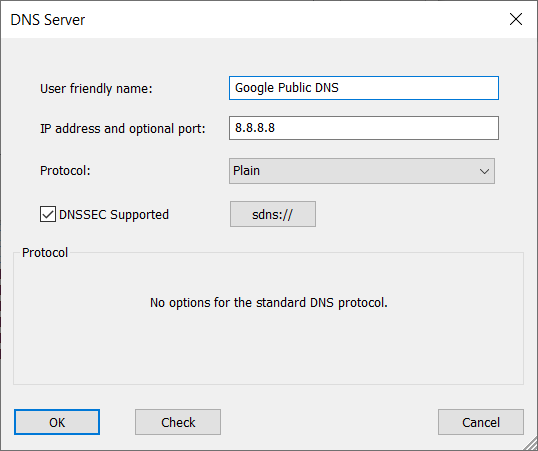 Google Public DNS
After adding a
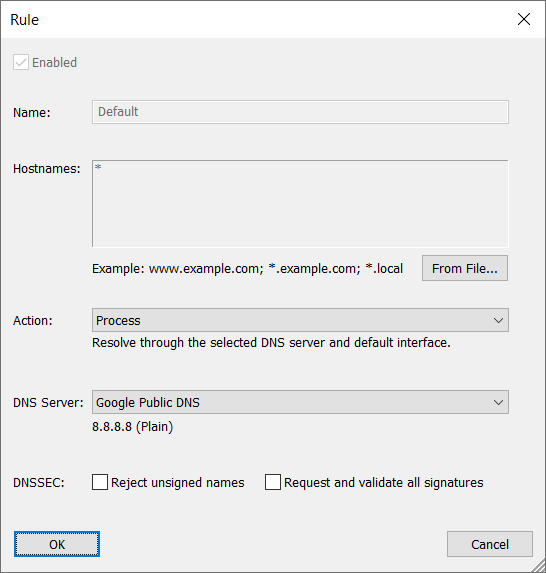 Default rule example
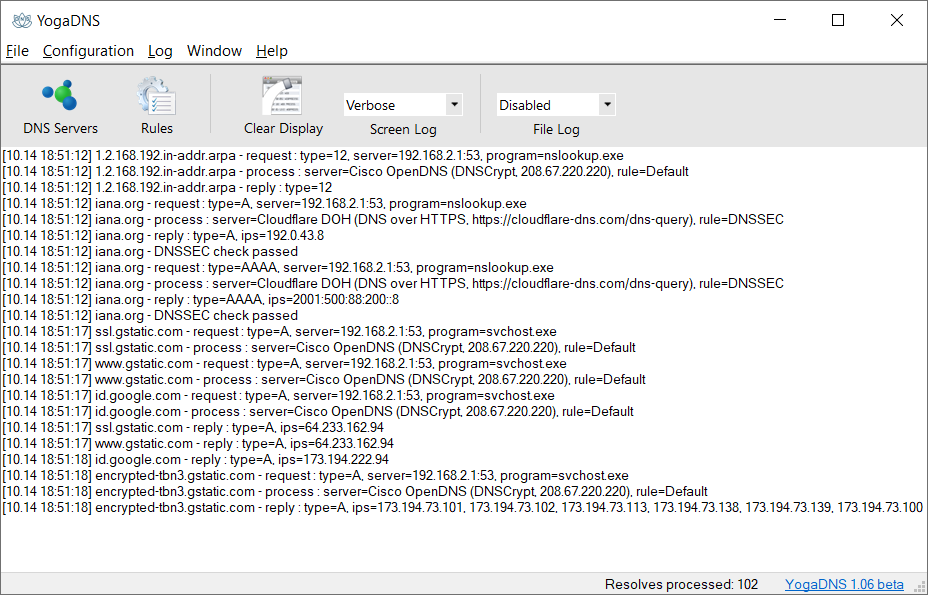
It is possible to create multiple Rules to resolve certain hostnames through selected DNS servers. When a resolve gets processed by YogaDNS through a DNS server, you should see the log messages as below (set Screen Log to Verbose or Debug for more output):
[10.31 17:08:51] iana.org - request : type=A, server=10.0.0.1:53, program=nslookup.exe
[10.31 17:08:51] iana.org - process : server=Google Public DNS (Plain, 8.8.8.8), rule=Default
[10.31 17:08:51] iana.org - reply : type=A, ips=192.0.43.8
[10.31 17:08:51] iana.org - request : type=AAAA, server=10.0.0.1:53, program=nslookup.exe
[10.31 17:08:51] iana.org - process : server=Google Public DNS (Plain, 8.8.8.8), rule=Default
[10.31 17:08:51] iana.org - reply : type=AAAA, ips=2001:500:88:200::8
You can now close the main window of YogaDNS, as it will keep running while minimized in the system tray. To make YogaDNS start automatically on Windows startup (user logon), enable
To open the main window, click the YogaDNS icon on the system tray or taskbar. The window has a menu, a toolbar and the log output, as seen below.
 YogaDNS main window
The elements of the toolbar correspond to the menu commands. You can manage the DNS Servers and Rules, clear the screen log by clicking
When you close the main window, YogaDNS keeps running while minimized in the system tray. You can change this behavior by
To manage the list of DNS servers used by YogaDNS, open
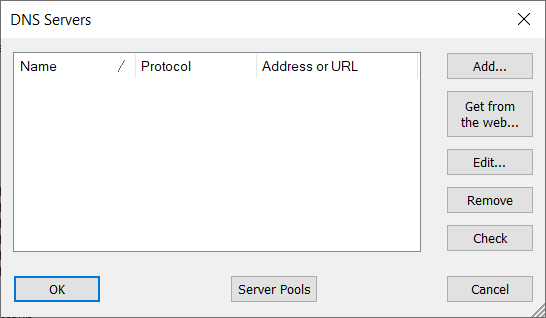 DNS Servers window
You can use the
The
When you add or edit a DNS Server, the following window is displayed.
Plain DNS example
The available parameters depend on the selected protocol. The above example is of the Google Public DNS (Plain protocol).
The
The
Select
For the DNSCrypt protocol, you can specify the
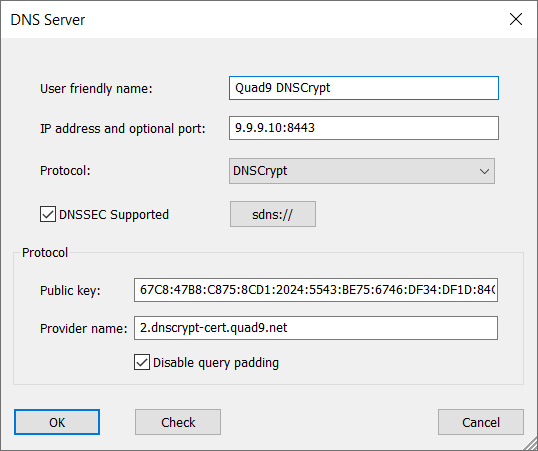 DNSCrypt example
For the DNS over HTTPS protocol, you can specify the
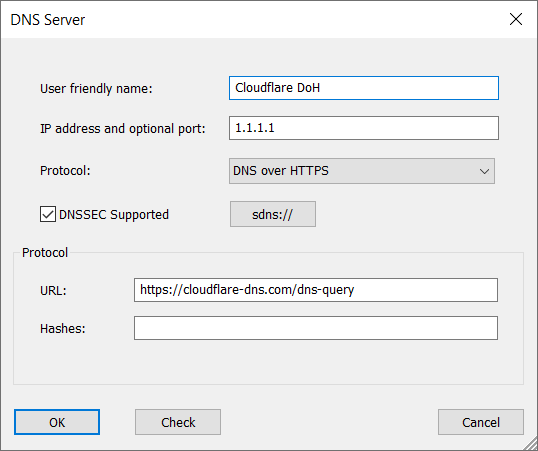 DNS over HTTPS example
For the DNS over TLS or DNS over QUIC protocol, you need to specify the
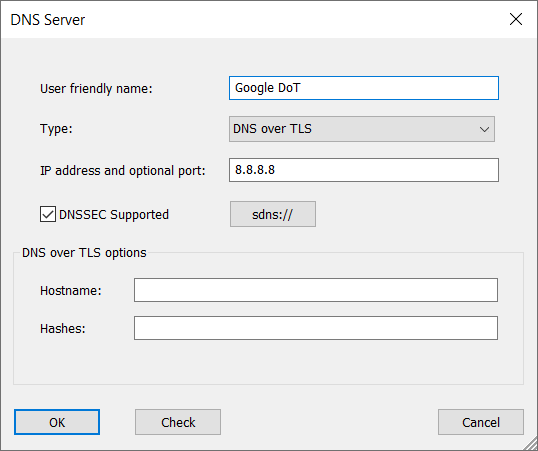 DNS over TLS example
By clicking the
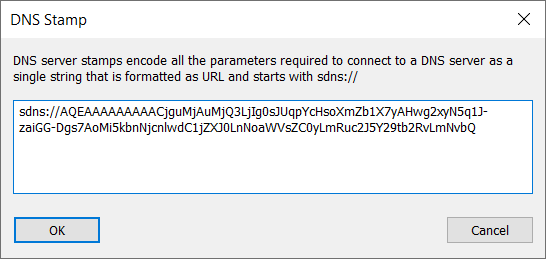 DNS Stamp example
Additionally, YogaDNS features built-in support for NextDNS.
Rules are an essential part of YogaDNS. Basically, they allow you to specify a DNS Server that will be used for each resolve request based on the requested hostname. You can also block or bypass the request or force it through a selected network interface. To find the list of the rules, go to
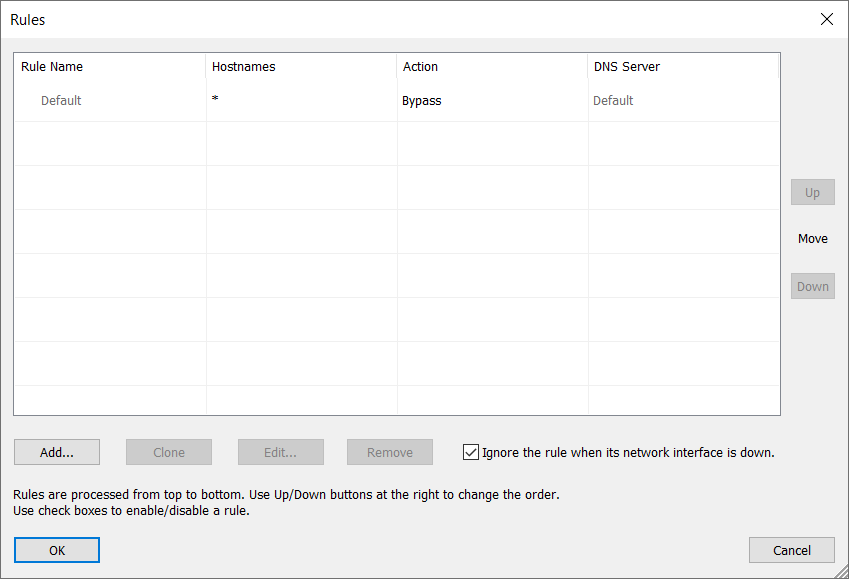 Default DNS rules
You can use the
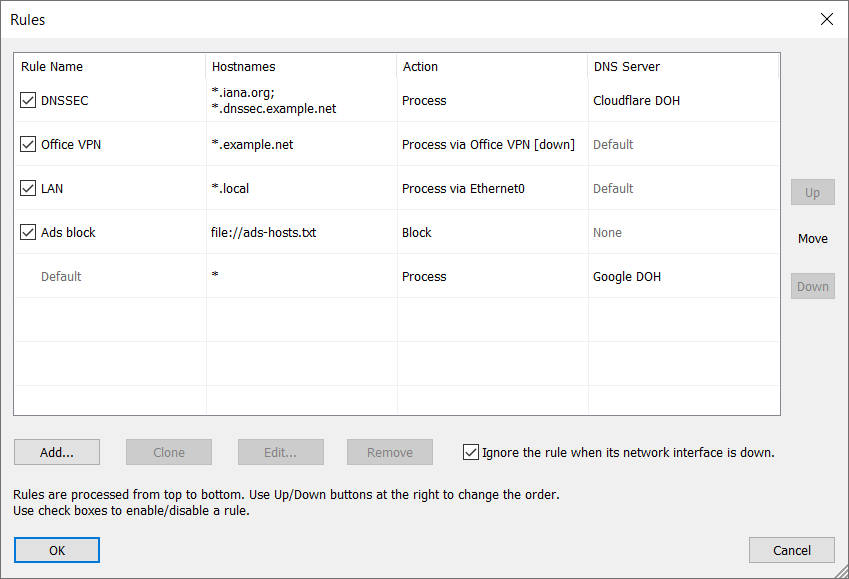 DNS rules example
Use the
If you set a specific network interface for a rule, you can tell YogaDNS to
You can edit the Rule Name, set the Action and set the DNS Server right in the list. To edit Hostnames and change other parameters, double-click the rule or click
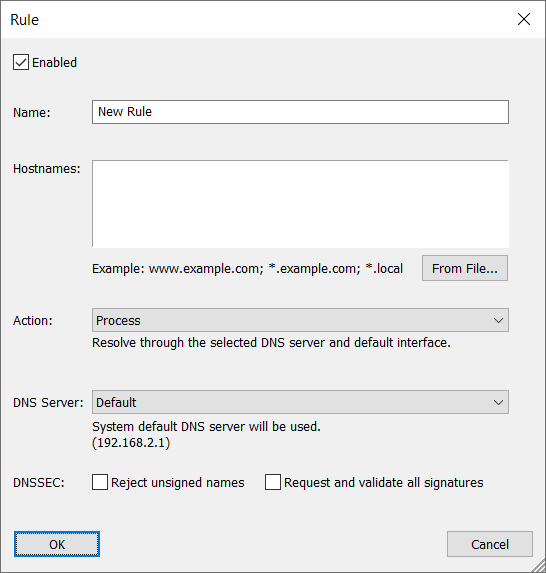 Rule window
Here you can set an arbitrary
Set the list of the
Click
Use the
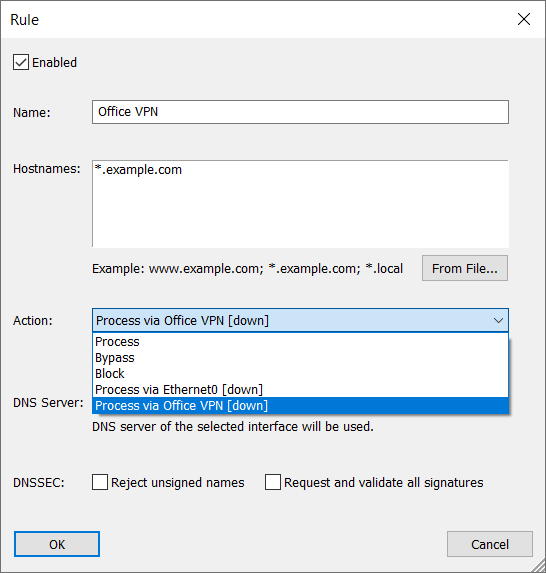 An example of a rule with the Action list opened
If
In the
Depending on the actual values of
The
DNS Servers and DNS relays can be combined into a pool. If you assign such a pool to a rule, YogaDNS will use a random DNS server from this pool to make a resolution. This will improve the redundancy and distribute the load.
Another scenario for the pools is the use of DNS relays (a.k.a. Anonymized DNS). In this case, a pool should contain relay(s) and DNSCrypt server(s). YogaDNS will forward queries over the relay(s) to the DNSCrypt server(s), and, thus, the queries will be anonymized. If a pool contains more than one server or relay, a random server or relay will be used for each query.
To create a pool, open
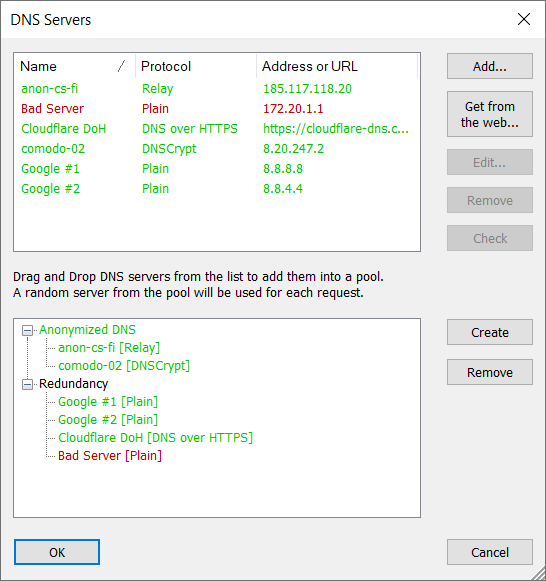 DNS Server Pools
The above example illustrates the use of pools. Two pools are defined: Anonymized DNS and Redundancy.
Anonymized DNS pool contains the DNSCrypt server comodo-02 and the relay anon-cs-fi. All requests to this pool will be processed by the comodo-02 server over the anon-cs-fi relay. If the server or the relay fails, the resolution will also fail.
Below is a verbose log example of a resolution request processed through this pool:
[03.02 14:40:24] iana.org - request : type=A, server=192.168.1.1:53, program=nslookup.exe
[03.02 14:40:24] iana.org - process : server=comodo-02 (DNSCrypt, pool Anonymized DNS, relay anon-cs-fi, 8.20.247.2), rule=Default
[03.02 14:40:24] iana.org - reply : type=A, ips=192.0.43.8
Redundancy pool contains four DNS servers with the various protocols. YogaDNS will use a random server for each query. If one server fails, the query also fails, but the DNS client will likely attempt a retry that may be processed by another server as in this example:
[03.02 15:07:13] iana.org - request : type=A, server=192.168.2.1:53, program=nslookup.exe
[03.02 15:07:13] iana.org - process : server=Bad Server (Plain, pool Redundancy, 172.20.1.1), rule=Default
[03.02 15:07:15] iana.org - request : type=A, server=192.168.2.1:53, program=nslookup.exe
[03.02 15:07:15] iana.org - process : server=Google #1 (Plain, pool Redundancy, 8.8.8.8), rule=Default
[03.02 15:07:15] iana.org - reply : type=A, ips=192.0.43.8
You can import publicly available DNS Servers to YogaDNS from the web using the
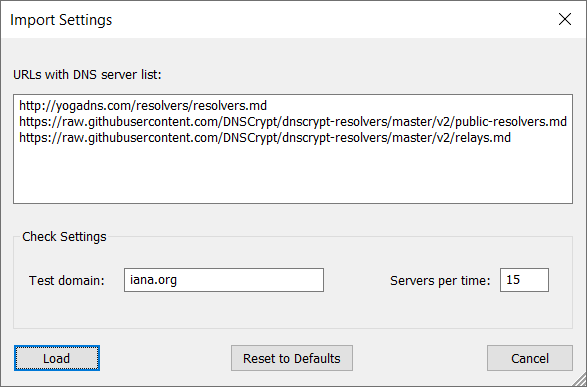 DNS Servers Import Settings
Here, you can edit
If you click the
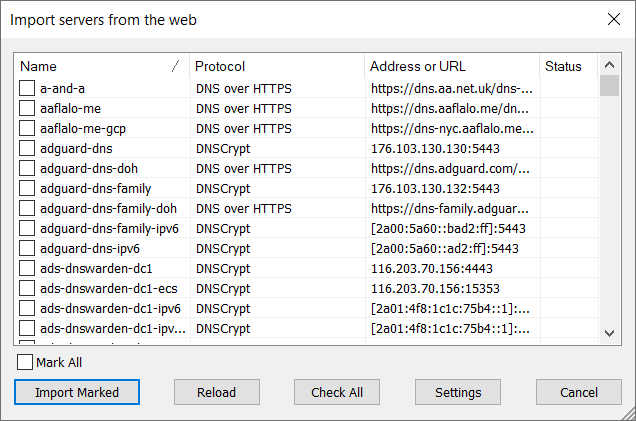 DNS Servers Import
Use the
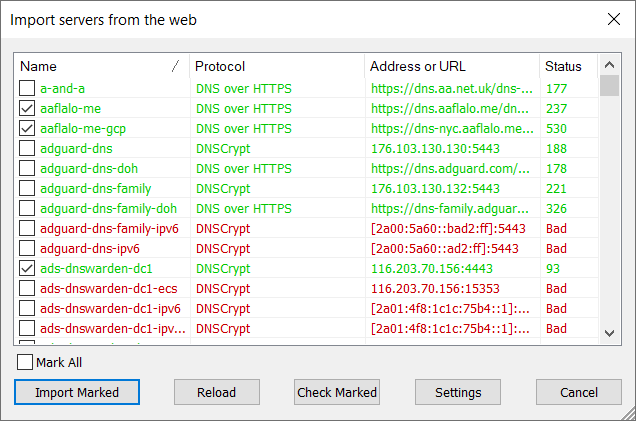 DNS Servers Import Checked
To select the servers that you wish to import to YogaDNS, mark them by ticking the square on the left side of the list and then click the
YogaDNS stores configurations in files (human-readable XML). From the
YogaDNS provides highly detailed, real-time messages about all activities. The messages can be output on the screen (log window) and/or as a file. There are four levels of verbosity: Errors Only, Normal, Verbose and Debug. You can set them independently for Screen and File through the toolbar or Log menu. To set the log file path, go to
YogaDNS can run as a Windows Service. This mode provides two main features:
Running YogaDNS as a service requires a special configuration and may require additional effort and skills. A dedicated help tool, ServiceManager.exe, was added to simplify the configuration and management of the YogaDNS Service.
You can run YogaDNS Service Manager using the
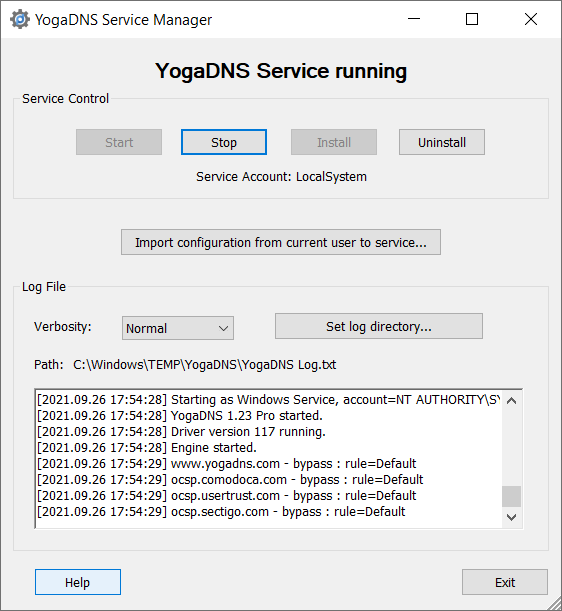 YogaDNS Service Manager
Four buttons in the Service Control section allow users to Start, Stop, Install, and Uninstall the YogaDNS Service.
The Service Account string located below the buttons indicates the user account from which the service is running. You can change this using the Services snap-in (under Administrative Tools in the Windows Control Panel) or a command-line utility, sc.exe. By default, the LocalSystem account is used.
IMPORTANT! To run the YogaDNS Service after the free Pro version trial period, you must register YogaDNS with a license key under the corresponding user account or across the entire system. To do the latter, please check
Users can run and test the YogaDNS Service without registration during the initial 31-day free Pro version trial period.
After installation, the service runs with an empty configuration.
Run YogaDNS in the regular mode to build and test the configuration for the service mode. Once that is done, save the configuration to a file using the
You must restart the service to apply the changes.
The YogaDNS Service can write the log file. To enable this, set the
